


Self Tapping Threaded Insert Manual Installation Tools
self tapping threaded insert
manual installation tools
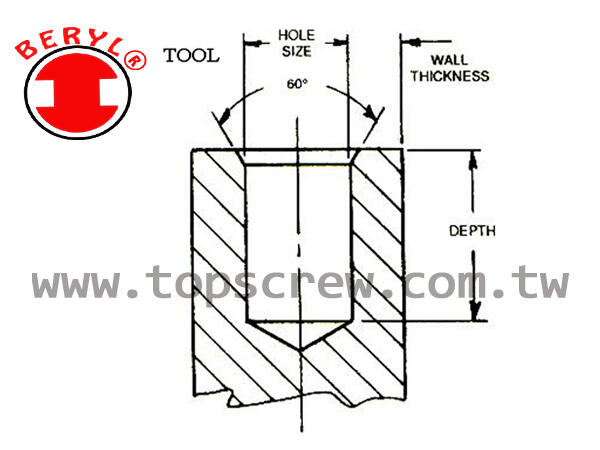
I. hole size:
recommended hole size is indicated on each data sheet and is intended to be for reference only. hole size may need to be increased or decreased depending on base material, installation torque or performance required. optimum hole size should be determined by requesting samples & installing them in the intended material.
II. hole depth:
in thru hole applications the insert length should not exceed the material thickness. in blind hole applications the hole depth should be 1.2xinsert length and this value is indicated on most data sheets.
III. countersink
a 60°countersink is required for most materials to insure a flush surface after installation.
IV. wall thickness
wall thickness should be 0.35 to 0.5 x hole diameter depending on base material.
★ other size, material are available upon request
How to install Self Tapping Threaded Insert
Step 1. Drill the hole, screw insert on to the tool with slot pointing downward.
Step 2. Mantainting the tool perpendicularity, rotate the tap clockwise & screw its way into material.
Step 3. Back out the tool anticlockwise & it will automatically released from the insert.
Hole Diameter Recommended hole diameter - Hole diameter data is indicated on the datasheet for reference purposes. The hole diameter may vary depending on the material, applied torque, and the desired level of engagement. The ideal hole diameter should be determined based on the material to which the insert will be assembled.
Hole Depth For through-hole applications - The length of the insert should not exceed the thickness of the material. For blind-hole applications - The hole depth should be 1.2 times the length of the insert, as specified in the table.
Countersink A 60-degree countersink is necessary to ensure that the insert and the assembled components are flush.
Wall Thickness The wall thickness should be 0.35 to 0.5 times the hole diameter, depending on the material of the application.